 Shop
Shop My
My Custom


FREE 5-Ingredient Recipe EBook
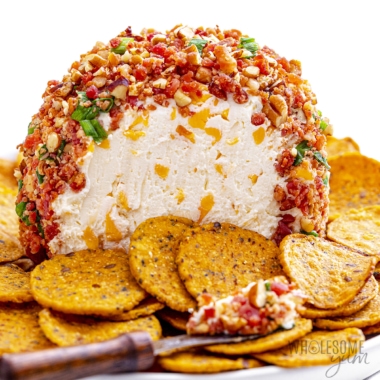
GET IT NOWI still remember the first time I made little piles of shredded cheese and baked them. Someone in my Facebook group mentioned it and I was intrigued. When I pulled out the melty puddles of baked cheese from the oven, it was hard to believe they’d turn into actually crunchy cheese crisps. But they did, and since then I’ve made them with many types of cheese. If you’re craving a crispy, savory snack, make a batch of these cheese chips with me to satisfy that craving!
Why You Need My Cheese Crisps Recipe

- Crispy, crunchy, and cheesy chips – If you like parmesan crisps, these are just like that, except I make them in different flavors. They have a light, crisp crunch and so much flavor.
- Make them with any cheese – You can make my cheese chips recipe with cheddar, parmesan, or other cheeses. I’ll explain the pros and cons of each, plus tons of variations and ideas to make them your own.
- Easy, healthy, and affordable – This little snack takes minutes to throw together, plus it’s packed with protein, low carb, and gluten-free. Not to mention, it costs much less to make your own than buy the pre-made ones!

Choosing Which Cheese To Use
The only ingredient you really need to make baked cheese chips is… shredded cheese! This cheese crisp recipe actually works with all hard or semi-hard cheeses. Here’s an overview of the results you can expect with different types:
- Parmesan – Parmesan crisps (pictured below left) are the lightest and store the longest, which is probably why you see them in stores the most. This is probably the most foolproof cheese to make cheese crisps with, because it basically always comes out crunchy. They also come out saltier than those made with many other cheeses.
- Cheddar – Cheddar cheese chips (in my bottom right picture) are a little more challenging, because you have to get the timing just right. If you don’t bake them long enough, they will be soft and pliable — instead of crispy — but if it’s too long, they’ll burn. I love them when done right, though!
- Mozzarella – It has a lot of moisture, so turns out less crunchy, but I do like the neutral flavor. I recommend low-moisture part-skim mozzarella for best results with this type.
- Pepper Jack – Choose this if you like some heat. It’s my husband’s fave!
- Swiss – A good option if you like a stronger flavor.
- Colby – Mild and creamy, so it’s great for using the cheese chips as dippers.


My favorite is actually a combo of cheddar and parmesan, plus a sprinkle of Italian seasoning for flavor. See my flavor variations below for other seasoning ideas!
How To Make Cheese Chips
I have step-by-step photos here to help you visualize the recipe. For full instructions with amounts and temperatures, see the recipe card.
- Mix the cheeses in a bowl. I only do this if I’m using multiple types, like I did here.
- Sprinkle in piles. Place tablespoon-sized heaps of the shredded cheeses (think 2-inch circles) onto a baking sheet lined with parchment paper. Sprinkle on any seasonings you like — or skip them if you want.


- Bake until melty and golden. Pop the cheese crisps in the oven and bake until the edges start to brown. Watch closely, as they go from done to burnt quickly!
- Cool to crisp up. Let the chips cool in the pan until they are no longer gooey, then use a thin spatula to transfer to a paper towel or cooling rack. (I like this spatula because it’s super thin and gets underneath easily. Cool completely to get fully crunchy.

My Tips For Crispy Results
After making these so many times, I’ve found that several factors affect how crunchy your cheese crisps get. Here’s what to watch for:
- Size and thickness of the piles – Keep your piles of cheese fairly small, and don’t layer them too thick. You want the cheese to spread into a very thin layer as it bakes in the oven.
- Type of cheese – Some varieties melt faster than others. I’ve also found that pre-shredded cheese works a little better than freshly grated, as it’s less oily.
- Spacing – Make sure you leave enough space between the piles for them to spread, otherwise you’ll end up with a sheet of cheese! That’s still perfectly edible, but individual chips are better for most purposes. Plus, the edges get the most crispy, so I much prefer separate chips (more edges!).
- Browning – The time in the oven will vary depending on your pan and your oven. The cheese crisps are done when the edges are golden brown — that’s what I watch for. If you don’t bake them for long enough, they’ll turn out chewy.
- Don’t let them burn – These will go from “not yet” to burned very fast! I turn on my oven light and set a timer to few minutes early, so I can keep an eye on them towards the end.

Flavor Variations
One of my favorite things about making your own cheese crisps instead of buying them is that I can customize the flavor! I used a blend of cheddar and parmesan with my Italian seasoning blend.
I’ve also made these cheese crisps topped with:
- Everything bagel seasoning
- Ranch seasoning
- Sour cream and onion seasoning (love that it’s all natural!)
- Taco seasoning (perfect with Mexican cheese blend)
- Simply a sprinkle of chili powder and lime zest (or choose any spices you like)
- A thin jalapeno slice on top for extra heat
Serving Ideas
I love these baked cheese crisps as a snack all on their own, but you can do almost anything with them that you would do with “regular” chips:
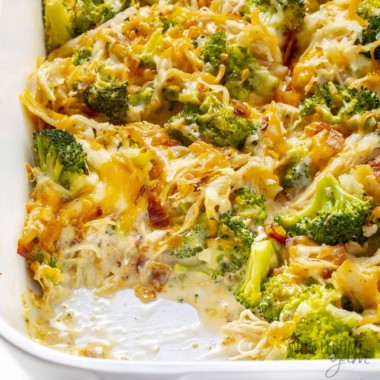
- Dipping – Along with tortilla chips and zucchini chips, these parmesan cheddar crisps are the solution for all the dips. They’re awesome for everything from spinach artichoke dip and crab dip to my fresh salsa recipe and guac. They’re also great dunked in marinara sauce, as pictured above!
- Topping – Pile them high with ground beef, tomatoes, onions, cilantro, and sour cream to make nachos! I don’t recommend heating them since they’ll melt, but sometimes I can get away with doing so briefly.
- Soups – Serve the cheese chips on the side for something crunchy, or melt them over the top of your soup. I love cheddar chips with taco soup or parmesan crisps with creamy mushroom soup.
- Salads – Crumble them over my Caesar salad or spinach bacon salad. I think they’re better than croutons!
Baked Cheese Crisps (Plain + Flavors)
My quick & easy baked cheese crisps recipe will show you the basic method for crunchy cheese chips, plus 7 simple seasoning combinations!
Instructions
Tap on the times in the instructions to start a kitchen timer.
-
Preheat the oven to 400 degrees F (204 degrees C). Line a large baking sheet with parchment paper.
-
In a medium bowl, stir the cheeses together.
-
Place uniform tablespoon-sized heaps of the shredded cheeses onto the baking sheet, 2 inches (5 cm) apart. (They will spread, so make sure to leave enough room.) Sprinkle with Italian seasoning, if using.
-
Place in the oven for 6-8 minutes, until the edges start to brown. (Watch them carefully, as they go from done to burned fast.)
-
Allow the cheese chips to cool slightly in the pan, then transfer them to paper towels to drain and get crispy.
LAST STEP: Leave a rating to help other readers, or tag me @wholesomeyum on Instagram. I’d love to hear from you!
Maya’s Recipe Notes
Serving size: 1/4 of entire recipe, or ~6 chips
- Tips: Check out my recipe tips above to help you get the crispiest results.
- Types of cheese and flavor variations: My cheese crisps recipe combines both cheddar and parmesan. You can use just one of them, or other cheeses. See my notes on types of cheese above, as well as seasoning variations.
- Store: While cheese chips are best fresh, you can keep them in an airtight container in the fridge for up to a week. They do soften with time, so I just pop them back in the oven and they crisp up again when they cool.
- Freeze: You can also freeze them in an airtight container for up to 6 months. Again, you’ll need to re-crisp them in the oven.
📖 Want more recipes like this? Find this one and many more in my Keto Cheat Sheet System, Healthy Ebook Bundle, and Keto Ebook Bundle!
I provide nutrition facts as a courtesy. Have questions about calculations or why you got a different result? Please see my nutrition policy.
Add Your Notes Your Notes
Try More Of My Recipes

© Copyright Maya Krampf for Wholesome Yum. Please DO NOT SCREENSHOT OR COPY/PASTE recipes to social media or websites. We’d LOVE for you to share a link with photo instead.
Baked Cheese Crisps
More Cheesy Recipes
I love cheese! If you like my baked cheese crisps, you might also like some of my other cheesy recipes:


221 Comments
Cheryl Still Hess
0Turned out great! I’m a beginner cook and the recipe was easy to follow. Love the extra tips. They helped.
Maya | Wholesome Yum
0Thank you, Cheryl! I’m so happy my tips helped you out.
Cheri
0Delicious!!! So fast and easy. Yum
Maya | Wholesome Yum
0Thank you, Cheri! I’m glad you liked these.
Carol Thompson
0Mmmmm, delicious, this is my new cheese cracker. So easy.
Maya | Wholesome Yum
0Thank you, Carol! I’m so glad you enjoyed these cheese crisps.
Pat
0These were good but didn’t stay crispy the next day. So disappointing
Maya | Wholesome Yum
0Hi Pat, Yes, they are crispy when fresh. You can pop them in the oven again to crisp up.
Michelle
0As Swiss I would LOVE to know which cheese the “Swiss” is … we do have many different cheeses (and they have all names). It’s like you’d call the Parmesan “Italian” 😉
Maya | Wholesome Yum
0Hi Michelle, In the U.S. it’s not the same as calling Parmesan “Italian”. 🙂 Here, Swiss is a specific variety of cheese. I believe the closest in Europe would be Emmental or Jarlsberg. Hope this helps!
Patsy Short
0What oven temperature to bake cheese crisps? Thank You Patsy
Maya | Wholesome Yum
0Hi Patsy, It’s 400 degrees F. I have this info on the recipe card above, so make sure you read it to ensure you don’t miss a step or timing. Hope you love these cheese crisps!
Virginia
0These are great. Thank you so much!
Daphne
0I just made these. I used parmesan and sharp cheddar cheese. I did some with chili powder, everything bagel seasoning and italian seasoning. They are very good! 8 minutes was perfect to cook them. They did not crisp up, though. Perhaps I need to let them sit a little while longer. I expected them to be crunchy.
Rose
0Mine turned out perfectly. Used a 375 F oven. Parchment paper. Watched closely. When the edges are browned, remove from oven. Left to cool in pan for a few moments. Then transfer to paper towel to sop up the grease. Then the racks to stay crispy.
I think if people follow the recipe, they will have a good result. I’ve only done cheese crisps in a frying pan previously. Then you can flip it onto an upside-down bowl and create an edible salad bowl. That was a big hit.
shari
0Hi Maya – I love all the recipes so much ,has changed my eating and habits for good! I have purchased your keto cookbook, love it. I found looking on the internet is also very good too. Just know, I am a follower.
Johnny Prince
0Could this work with comte or gruyere, both of which are semi-hard?
Maya | Wholesome Yum
0Hi Johnny, I haven’t tried those specific ones, but yes, they should work. Please let me know how they turn out!
Michelle Steele
0How long will these keep?
Maya | Wholesome Yum
0Hi Michelle, You can keep the cheese crisps in an airtight container in the fridge for up to one week. It’s best to crisp them up in the oven again, though.
Eliz-Ra
0I’ve been on the lookout for simple snack bakes and this has been a thumbs up for me and my son! I did happen to use the bagged shredded Mexican and Chaddar cheeses i had, also I did not have parchment so I did use foil. Greased the foil with olive oil and seasoned the cheeses with garlic salt and Italian seasoning, Using foil i did bake at 400° for 7 minutes then dropped temp to 355° for 4 minutes. 👌🫶
Wholesome Yum D
0I’m so happy to hear this worked out for you and your son! Love the foil trick and your seasoned cheese blend, that garlic salt and Italian seasoning combo sounds delish. Thanks for sharing your tweaks!
Jill H
0Tried these with Italian seasoning, parm & cheddar mixture. They would be great with a veggie dip or marinara. I would also suggest having these with a slice of pepperoni on top or cold shrimp.
Thinking these as an addition to soups or salads. You could also add sesame seeds to the chips.
Teri Vickery
0Hi, I have been making these for quite a while now. I just experimented with putting the cheese in a nonstick muffin pan. They turn out beautifully and uniform in shape! With 2 12 cup pans I can make 24 pieces at a time. It takes no time at all to make a few dozen. I would like to know if anyone has tried freezing them and if they stay crisp once thawed.?
Angie
0Would these be able to cook just fine in a mini dash skillet? I love whisps and really would love to make these. I’m just worried I’ll burn them lol
Wholesome Yum D
0Hi Angie, I haven’t tried this recipe in the Dash but please let me know if you try it out!
Karin
0I’m assuming it’s best to use freshly grated parmesan from a block instead of the pre-grated stuff in the plastic jar?
Maya | Wholesome Yum
0Hi Karin, You can grate it yourself on a grater or use pre-shredded from the refrigerated area of the store, but I would not use the shelf-stable powdery kind in a plastic jar.
Moop Brown
0These chips look like a nice snack that is crunchy and tasty and like something everyone will enjoy. Thanks
Cathleen
0I love this so much! It is definitely going to be one of my new go-to recipes 🙂
Katie Crenshaw
0I made these for my Caesar salad. They turned out so pretty and tasty. So much better than croutons!
Gwynn
0This recipe is so easy to make and so impressive for entertaining!
Silvia
0I didn’t know making parmesan crisps was this easy. I’m going to try making them this coming week, my family is going to love them.
Tammy
0I love parmesan crisps with soups especially! These are so good and addictive!
Becky Summer
0Me and my husband can’t wait to try this as we both have cholesterol and I am a diabetic.
Lok
0Will make again. Easy, Delicious, Cooked 9 minutes did not use any seasoning. Recommend!
Leslie
0This is such a great snack! I absolutely love your flavor options for this easy recipe! Salt and vinegar are calling my name!
Ann
0Ok these are dangerously addicting! So perfect to add on top of soups or salads!
Marie
0Parmesan cheese crisps are a snack I just can’t say no to! So crisp and cheesy and incredibly addictive! Loved the combination with cheddar in your recipe. I made them for friends and they disappeared off the plate in record time!
Marta
0You had me at cheddar and parmesan! I made these crisps to serve during family movie night. The problem is I made them hours before dinner and by movie time I had eaten them all my myself.
Amy L Huntley
0These are so cheesy. I love adding them to a yummy salad and pasta recipe!
Kristyn
0These are the perfect snack!! Crisp & cheesy, just what I love!! So easy to make, too!
Liz
0Such a great topping for a salad! So quick and easy to make.
Freya
0So quick and delicious! I love the flavour of these, a perfect snack!
Sharon
0I’ve seen the bagged version of crisps in the store but didn’t like the added ingredients so I love this recipe so I can make my own at home and know what’s in them.
Jennifer
0Oh, these crisps are delicious!! My favorite snack at the moment!!
Taylor
0These were AMAZING! So flavorful with the perfect crunchy and crisp texture. They were the perfect snack and I loved adding them to salads too. Yum!
Ann
0Cheese crisps are so easy to make!
Glenda
0These are fantastic! What an easy delicious snack. They didn’t last very long at our house, though. I”m gonna have to hide a few from the next batch. lol
Paula
0What did you add for moisture to bind dough to make bowl?
Donna Batrone
0I make these almost weekly. They are so simple to make and delicious!
Susy
0I LOVE these! Actually, I even got so desperate after eating all that I’d baked, I tried some in the microwave. Just put the cheese right there on the glass plate in the microwave. Still came out great – easy and quick. I mixed up the cheeses and used pepper jack, cheddar, parmesan, and mixes of them. All were excellent! Thanks for this recipe!
Jenny
0I loved them! How do you store them? Do they need to be refrigerated?
Maya | Wholesome Yum
0Hi Jenny, These will last for up to a week when stored on the counter in an airtight container. I recommend baking them again briefly and then letting them cool to crisp up.
Terri
0I made them as directed and had every single one of them stick to the wax paper. So frustrating! I grated my own cheese (I think it tastes better) and used the seasoning. I decided to try again and used a silicone mat. Delicious but definitely NOT crispy. Any help would really be appreciated!
Maya | Wholesome Yum
0Hi Terri, You need to bake these on parchment paper, not wax paper. Wax paper is not safe for the oven, so the wax probably melted and caused sticking. I would not eat them if you used wax paper. If you do try them with parchment paper, note that you may need to add a little extra time to get them crispy but watch them carefully, as they go from done to burned fast. Also, allow them to cool fully and they should firm up. Hope this helps!
Chris
0Worst recipe ever! I tried this FIVE times and the crisps would NOT remove from the parchment paper ever after cooling. They were glued down. I ever tried spray oil after the third time! I followed the instructions exactly, and this was a total disaster. What a total let down when wanting a good snack.
Wholesome Yum D
0Hi Chris, Sorry to hear this recipe didn’t turn out for you. Are you using freshly shredded cheese or from a bag? Also, are you letting the crisps cool fully before removing them from the pan?
ESS
0Do they freeze well?
Wholesome Yum M
0Hi ESS, I don’t recommend freezing these, they do great in the fridge in an air-tight container. Enjoy!
Scotty Andrade
0Hi again! I should have read the comments below first! Lol. I see that you store the chips at room temperature in an air tight container. Thanks all!
Andrea Zatuchney
0How far in advance can you make these?
Maya | Wholesome Yum
0Hi Andrea, These will last for up to a week in the fridge, but they’ll soften, so you’ll need to crisp them up briefly in the oven and let them cool again.
Scotty Andrade
0Thanks for posting this! I love the packaged cheese crisps you can buy in the store, but they are so expensive. I can’t wait to try your recipe!
I’m sure it will be awesome! My question is… How do you store these chips? I would like to make a large batch to munch on during the week. Any tips on storage so they stay crispy?
Thank you!
Dee
0I used cheddar and parm like the recipe said, but my chips did not get crispy. I will try again with just the parm cheese.
Carolee
0They are delicious,I made them twice in two day there really great
Debra Favaloro
0Can I use cheddar and pepper jack cheeses? I’m not really fond of Parmesan. I tried making just cheddar crisp and they didn’t get crisp. I found your recipe (love it) and now know it was thickness and amount of cheese that I had wrong. Thank you in advance for your advice.
Wholesome Yum M
0Hi Debra, Yes, both will work! Cheddar or pepper jack crisps need to bake longer than parmesan crisps do. They won’t get as crunchy as parm crisps, but they are able to dip and hold toppings for things like nachos. I hope this helps!
Joan Rosenberg
0My first try at cheese crisps…I couldn’t stop eating them!!! They are crispy and salty, sooo much better than store bought! I split them, 1/2 plain, 1/2 Italian herbs, both great.
Debra
0I made 2 batches in 2 days ! It’s so easy and so nice to eat !
Peggy
0The parmesan and cheddar chips taste great when fresh but do not stay crispy. The parmesan only chips do stay crispy for days which is great if you want to make them ahead to have on hand. I sprinkle them with “Everything bagel seasoning” and love them. You can re-crisp the cheddar chips in the microwave by putting a dinner plate with a paper towel on it full of chips for about 30 seconds and then letting them cool.